LEA Grating Acuity Test
#251300
Designed by Lea Hyvärinen, MD
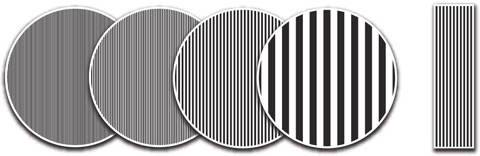
Figure 1. For the measurements of the grating acuity there are four gratings, 8 cpcm, 4 cpcm, 2 cpcm, and 0.5 cpcm (cpcm = cycles per centimetre of the surface). A keycard grating is made of the 2 cpcm grating.
The LEA Grating Acuity Test requires discrimination of the direction of long lines, which is a more demanding task than the detection acuity
measured with LEA GRATINGS or the Teller Acuity Cards. The test gratings are presented to children and adults at different distances to
find out at which distance the direction of lines can be perceived. Knowing the distance and which grating was used, the grating acuity value can be read from a nomogram.
When assessing vision of a new child or adult it is important to know that some of them perceive gratings not as straight lines but as
irregular patterns and therefore cannot define the orientation of the lines. It is also possible that the person does not perceive the gratings at
all, which is rare but will be found in persons with brain lesions, which may not affect the person’s vision in any other way. Therefore it is wise
to demonstrate the gratings by showing the 0.5 cpcm, 2 cpcm, 4 cpcm and 8 cpcm gratings at a close distance when starting the test situation
and ask the person how he sees the gratings.
If the person answers that “the broad lines are regular straight lines in this direction but the other ones are not; the next narrower lines are
visible only in a part of the surface, here, and the really fine lines wiggle and are not straight at all”, then you have made an important observation
already in the beginning of the test and know that the person has difficulties in processing many straight lines at once. This difficulty in
visual perception can be detected with no other clinical tests but the gratings and asking how they are perceived.
You can measure grating acuity as resolving/discrimination of gratings only when the gratings are seen as straight lines. The
broad lines are perceived thinner and thinner the farther you go, so they become fine lines. If gratings are used as a detection test (Teller Acuity
Cards, Keeler Acuity Card Test, LEA GRATINGS) we are not aware how the child perceives the gratings.
You might want to experience yourself the difficulties in perception of gratings by turning the grating in front of you. Even a perfectly normal
visual system cannot code the fast turning gratings but you see all kinds of illusions.
During the measurement you may notice that lines in different orientations are perceived at slightly different distances. That usually means
that the person has some uncorrected astigmatism. This does not mean that the spectacles had wrong values.
The measurement is easiest if you have a metric tape measure taped on the floor and you walk along it. Then you can check the distance every time
when the person/child correctly reports the orientation of the lines.
Children may need to train to show the orientation of lines with their hand or using the keycard-grating. If a child’s responses are irregular, it is possible that the lines are seen moving and thus their orientation is difficult to
define. Perception of gratings
Instructions
- Stand at 120 cm if the distance is within the visual and cognitive sphere of the person/child, closer if needed. Present the gratings progressing from 8 cpcm to 0.5 cpcm. Use the first grating that can be seen at that distance.
-
The test grating is first moved to a distance where the person/child cannot discriminate the direction/orientation of the grating lines. When testing a child, say something like “Now I walk a bit farther until you no more see the lines. Do you see them now? No; then we can start”.
- Bring the grating slowly closer to the person/child until he can perceive the orientation of the grating.
-
Use the 4 different orientations when defining the threshold distance. To rotate the grating into a new orientation, turn the evenly grey surface toward the subject. Rotate the grating and then turn the grating in its new orientation toward the adult/child. Ask the person to respond by showing the orientation of the lines with his hand or with the keycard grating. Some children can use only horizontal and vertical orientations.
-
The direction of the lines should be varied randomly. It is wise not to show the same direction a second time immediately after the first presentation or to show the lines in a direction that the person has just used in his (wrong) answer because people tend not to repeat an answer. Therefore the use of two presentations of the same orientation of the lines is likely to lead to a wrong answer to the second presentation.
-
The threshold distance is defined when at least three out of five presentations lead to the correct response at that distance. Children may not tolerate five measurements, so we often have to be happy with 2-3 measurements, especially if they are at nearly the same distance.
The grating acuity value as cycles per degree (cpd) on the Y- axis that corresponds the distance (m = meter) of the threshold measurement is read on the nomogram I corresponding the grating used (Diagram A, B, C or D). Find the value of the threshold distance on the X-axis (e.g. 2 m on the 8 cpcm nomogram), go up to the nomogram line (which you hit at 2 “squares” above the horizontal 24 line of the Y-axis) and record the cpd value on the Y-axis (24 + 2x8/5 = 24 + 3.2 = approximately 27) that corresponds to the threshold distance 2 m.
Nomogram I. Grating acuity (cpd) at different distances, measured with metric tape measure.
Grating acuity values and macular lesions
If you move a grating to a twice longer distance, as above the 8 cpcm grating to a distance of 115 cm, it is a 16 cpd stimulus. At 229 cm (about 230 cm) distance, it is a 32 cpd stimulus and its diameter is one fourth of its concrete size. This regularity is lost; if there is one larger scotoma or several small scotomas in the central visual field. Both of them “eat” the area of the visual field that is available for collecting the information. As an example, a person with relative central scotoma was tested with three gratings:
The 8 cpcm grating at 120 cm was equal to 16.8 cpd (stimulus size 10.3 deg),
the 4 cpcm grating at 190 cm was equal to 13.5 cpd (stimulus size 6.7 deg),
the 2 cpcm grating at 300 cm was equal to 10.8 cpd (stimulus size 3.6 deg)
The measurements with stimuli of different size depict the quality of the central visual field. When three gratings are used to measure the threshold distances, these three results depict the decreased function of the very central visual field in a retina with “mild” pigment dispersion and a recognition visual acuity value within the range of age normal findings: the smaller the stimulus, the lower the grating acuity value.
As you can read in the Introduction to Grating Acuity Tests, this important finding can be studied further by using low contrast gratings.
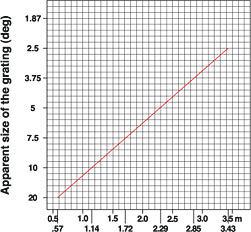
The size of the stimulus is given in the nomogram II.
Nomogram II. The size of the stimulus; i.e., the diameter of the stimulus in degrees at different distances.
Assessment of young children and children with different intellectual abilities
The possibility to use grating tests is related to the age but more to the communication and concept development of the child. I have used them in the assessment of children with developmental delay in kindergarten and seen 1) that the child cannot even move his finger along the lines, so that child needs to train before we can test. 2) Some other children hide their eyes behind their hands as soon as they look at the gratings demonstrating that the gratings most probably are distorted and unpleasantly difficult to their visual system. 3) Other children can move their finger on the broader lines but not on the 8cpcm lines. None of these children could answer the question whether the edges of the lines were straight/smooth or irregular. Even in this group of children it is thus possible to create test situations that help us to detect something new about their visual system.
The standard test situation requires that the child can report the direction of the lines, by showing or describing (going up/going to the side/going up on this side (for the diagonal lines), himself or assisted. Usually we have first assessed the child's ability to perceive and copy directions of lines using the Mailbox test and several narrow objects that the child arranges parallel/in the same direction. This way we know that the child does have the ability to perceive and report the direction of lines. Many first graders do not know what the word parallel means so it should be avoided in the beginning and used first when the child masters the task of placing narrow objects, like pencils, at a certain distance from each other. Some children want to be efficient and push all the pencils next to each other. Then you have to explain the task a second time.
Recording the results
When the result of the grating acuity measurement is marked on the Recording Form with the recognition acuity value of the testee, you see the difference between the results of these two measurements of different types. You can also mark the values measured with gratings with perceived different size (measurements at different distances). They are the points where the slopes of contrast sensitivity curves hit the X-axis.
The Recording form can be used for results at all contrast levels and gives us an overview of the visual functioning in the fixation area of the visual field.
Figure 2. The results of a patient with a grating acuity 8 cpd (X) and a recognition acuity value 0.1 (6/60, 20/200) (x) are marked on the recording form.
Grating acuity alone is a poor depicter of visual function.
Therefore, never say that the child's vision was measured to be normal. Say that "grating acuity value was within the range of normal, other observations and measurements are needed to give a more complete picture of the child's visual function."
PREREQUISITES FOR MEASUREMENT OF GRATING ACUITY
During the measurement of grating acuity, we expect the infant/child to respond with smooth tracking or rapid eye turn to the grating when it is presented. This response requires that:
- The infant or child sees the grating in that part of the
visual field;
- The infant or child can direct his or her attention to
the stimulus;
- The infant or child has the ability to plan tracking or
the saccade toward the target;
- The infant or child has the motor function of the eye
muscles to execute the plan;
- The stimulus is presented within the visual sphere of
the infant or child.
On each grating paddle the frequency of the printed grating is given as cycles per centimetre (cpcm). At the distance of 57 cm (22.5 in), 1 centimetre equals 1 degree of visual angle*. Thus, only at that distance the cycles per degree value of each grating is equal to the cpcm printed on the paddle. For example, at 57 cm, the 0.25 cpcm paddle is equal to 0.25 cpd. When the paddle is brought closer, the number of cycles per degree decreases. When used at a distance longer than 57 cm, the number of cpd increases. In the table below, cpd values are calculated at some common distances.
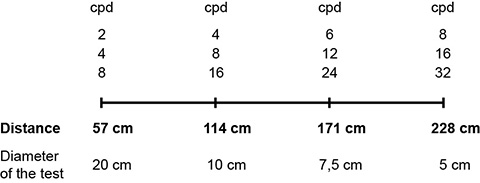
If another distance is used, the cpd results can be calculated using this formula:
|
Distance Used 57.2 cm |
x cpcm = cpd |
*NOTE: This is derived from the formula below. A circle has 360° and the circumference of a circle is equal to 2πr (where r = the radius). In this case, "r" is equivalent to the distance between the child's eye and the paddle. If the circumference of a circle measures 360 cm, then each degree of angle subtends to a distance of 1 cm on the circumference. The radius of such a circle is then calculated as follows:
| r = |
360 cm 2 |
= 57.2 cm |
[ Instructions I Paediatric Vision Tests I Vision Tests ]
This document was last modified on